
Netgear EX2700 Setup | N300
Struggling to get started with the N300 Netgear EX2700 Setup or experiencing any obstacles during the setup process? Find out the solution here.
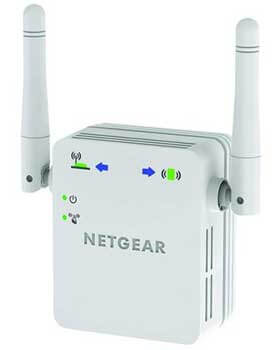
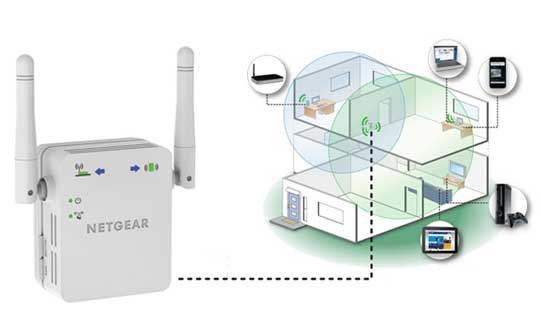
Netgear EX2700 WiFi Range Extender (N300) is a compact WiFi device that comes with multiple innovative features. It is a dual-band home networking solution that allows homeowners to eliminate all WiFi dead spots within their homes. Although it is a lower tier of the product of Netgear Extender EX series, it is still capable of extending your existing WiFi network coverage up to 800 sq. ft. of area. The data transmission speed of the device is up to 300 Mbps, especially when the device is set on a single band. However, you may expect up to 1200 Mbps internet speed while using both frequency bands simultaneously. Additionally, the N300 Netgear WiFi Extender EX2700 Setup is super easy and there are multiple options to do that. You need to complete this process to start using an extended internet connection all across your home.
N300 Netgear WiFi Extender EX2700 Setup (WPS)
When it comes to setting up an N300 Netgear EX2700 model, you’ve got more than a couple of options. You can readily complete the setup process by using either WPS (one-button configuration), web-based setup, or Nighthawk app-based configuration methods.
Find out the steps below that you require to follow to execute a Netgear EX2700 setup by using WiFi-Protected Setup (WPS) method.
Things to Keep in Mind Before Getting Started
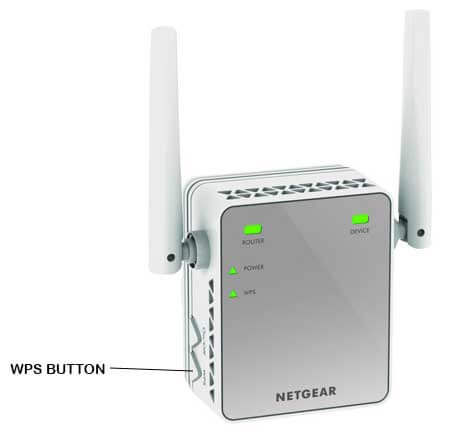
Before getting started, ensure both the router and Netgear Extender are not too far from each other. Having them in the same room is ideal to establish a connection fastly. The second thing you need to make sure is that your router has a WPS button on it. Without a WPS functionality on your router, you cannot set up your extender using the WPS method.
WPS Method Steps
- Connect the power adapter of the Extender to a working power outlet.
- Power your Extender EX2700 N300 on. A blinking Power LED means the device is booting up and a stable solid green Power LED indicates that your Extender is started up.
- Power on your existing WiFi router as well.
- Push the WPS button on the extender and wait for a few seconds.
- Next, push the WPS button on the router as well within 2 minutes.
- Now, just wait and watch. Your Netgear extender will automatically establish a connection with the router. A solid green Device Link LED is the sign you have completed the Netgear WiFi Extender EX2700 setup successfully.
The WPS setup method is the easiest and go-to Netgear Extender setup solution. It won’t take you more than 5 minutes to complete the setup process. However, in some cases, the WPS functionality may not work properly or you may fail to best utilize this technology. In such scenarios, you should consider other setup options Netgear provides. If you do not want to be bothered, we will recommend you get in touch with our technical support team. They are easily reachable via +1 408 477 8750 or [email protected].
N300 Netgear EX2700 Setup (Web-Based Method)
Netgear Extender Web-Based setup method seems a little complex. However, there is nothing complex about it. Undoubtedly, it is not as simple a process as Netgear WPS setup, but it is not tough as well. With a few easy steps that we are going to share with you here, you can readily complete the N300 Netgear EX2700 Setup. Before that, you need to know about some prerequisites for the web-based Netgear Extender setup.
Pre Requirements For Web-Based Netgear EX2700 Setup
- N300 Netgear EX2700 WiFi Extender
- Existing Router or WiFi System
- A WiFi Device (Smartphone, Computer, Laptop, Tablet. etc.)
- An Ethernet Cable that is Compatible with Your Extender and WiFi Device (for wired connection)
- A Stable Internet Connection
- Login Credentials (username & password) of Your Existing WiFi Router and Netgear Extender
Login Steps For the Netgear WiFi Extender EX2700 Setup
- Apply power to your Netgear N300 EX2700 WiFi Extender by plugging it into a working electrical outlet.
- Use your computer, smartphone, or laptop to connect to the Netgear Extender network which shows up as NETGEAR_EXT.
- The device Link LED on the extender lights as soon as your WiFi device will pair up with the extender.
- Now, launch a web browser (Safari, Chrome, Edge, Firefox, etc.) on your Wi-Fi device.
- Type in the Netgear extender setup web portal address (www.mywifiext.net) on the search and then press the “Enter” button.
- The Netgear WiFi Extender EX2700 setup portal will open up on your device’s screen.
- You need to create an account if you are using the Netgear WiFi product for the first time.
- If you already have an account with Netgear, you can escape the account creation step by clicking on the “Next Button” or you can simply use the Netgear default username and password to log in.
Additional Steps to Complete Netgear EX2700 Setup
Once you are logged into the Netgear Setup portal, you can proceed further with the following steps:
- Select your region in the next step.
- Next, you need to select the “WiFi Range Extender” from the options given there.
- A list of nearby WiFi networks will open up in the next few seconds.
- Click on your existing router’s network that you want to extend and then enter its password or network key.
- On the next screen, you need to set a new network name and the network key for a new extender WiFi network.
- The next page will display all the available extended WiFi networks.
- Now, connect the extended network on your device using the SSID and password that you created.
- Click the “Continue” button. You will receive a confirmation message of connection shortly on your device screen.
- Head over to the next page and fill in all the registration fields to complete the Netgear N300 EX2700 Extender setup.
- Finally, adjust the placement of your Netgear device, power cycle it, and then start using it again.
If you have followed this step-by-step process till the last, you have completed the N300 Netgear EX2700 setup successfully. Now, you can enjoy your favorite online streaming, game, and video conferencing without any network interruption. In case your problem is not solved, talk to our technical experts at +1 408 477 8750 or send your written queries to us via [email protected].
N300 Netgear EX2700 Setup (App-Based Method)
Netgear also provides an app-based configuration option. In fact, they recommend this option strongly to their customers. In case you are unable to set up your Netgear extender device by using the options we have shared with you so far, you can try this option.
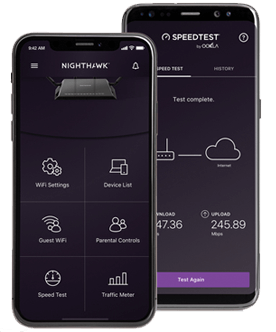
Before you start proceeding with this Netgear WiFi Extender EX2700 setup option, you need to ensure you have all the essential prerequisites, such as the router, extender, client device, an active internet connection, login credentials, etc. And if you do not have the Netgear Nighthawk app installed on your device, you first need to download and install it.
Steps to Perform Netgear EX2700 Setup Using the Netgear Nighthawk App
- Plug your N300 EX2700 Netgear WiFi Extender into a power socket.
- Power on your Extender device.
- Connect a client device that has the Netgear Nighthawk app installed on it to the Extender WiFi Network. Use (NETGEAR_EXT.) SSID from the network list to connect to the extender.
- Once a successful connection between the client device and extender is established, launch the Netgear app on your device.
- Now, just follow the instructions step-by-step till the last to complete the Netgear EX2700 setup process.
Netgear Extender Smart Setup Method
Netgear also provides a smart setup option to configure the N300 EX2700 WiFi extender device. This is quite similar to the web-based setup procedure. You can try out this setup option as well except for the three that we have mentioned.
To execute a Netgear Extender smart setup process, check out the user manual that you might have got within the Extender packaging. Follow the steps provided in the manual or simply get reliable assistance from our team. They will guide you on how to perform a Netgear Extender smart setup.
Netgear EX2700 Setup Issues That Have Been Frequently Reported
Several issues have been reported by customers regarding the Netgear WiFi Extender EX2700 setup. Some of those common issues are as follows:
- Netgear login and setup portal (mywifiext.net) is not working
- The extender is connected successfully but “no internet” shows up
- Incorrect extender login password
- Incorrect username
- Netgear app doesn’t work
- Incorrect IP address
- Showing error while entering Netgear default IP (192.168.1.250)
- Login page loading is taking too much time
- Frequent loss of connection between the router and extender
- Frequent loss of connection between a client device and the extender
- Extender’s unstable light issue
- Can’t find the Netgear extender network name
- Can’t access the Netgear login page
- Unable to complete the setup process
Resolve Netgear EX2700 Setup Issue With These Tips
If you encounter any sort of Netgear WiFi Extender EX2700 setup issues, you can try out the following troubleshooting tips. With these tips, you can resolve the issue in minutes.
- Reboot Your Netgear Extender Device
- Restart the Connected Router or the Client Device
- Reset the Extender to Factory Default Settings
- Move Your Router and Extender to Another Location Where the Network Signal is Strong
- Update the Netgear EX2700 Firmware if Required
- Check the Internet Connection in Your Router
- Switch the Frequency Band
- Check the Ethernet Cable (for wired connection)
- Ensure You are Using the Correct Netgear Login Web Portal and Credentials
- Plug the Extender into Another Electrical Outlet
- Replace the Existing Router With New High-Performance Router
- Keep Other Electronic Devices and Metal Object Away From the Extender
- Adjust the External Antennas
Puzzled Yet? Acquire Our Professional Technical Assistance
In most cases, the solutions we have provided here should resolve your issues. However, if they do not work for you or you are unable to correctly apply these solutions, our technical support team is always up to provide you with the required support. Contact us right away at +1 408 477 8750 or send your queries to [email protected]. We will be pleased to provide you with satisfactory solutions.
Common Mywifiext Setup issues
- Mywifiext.net Not Working
- Mywifiext.local Not Working
- Unable to Access Netgear Extender Login Page
- Incorrect Username and Password
- WiFi is Connected but No Internet
- www.mywifiext.net Login Issues
- Can’t Find the Extender Default SSID
- Server Error
- Unstable or Blinking LED
- Mywifiext.net Setup Issues
- Can’t access www.mywifiext.net
- www.mywifiext.net Taking too Long to Load