
Netgear EX6100 Setup | AC750
Not sure how to get rolling with your brand new AC750 Netgear EX6100 Setup? Here is the complete Netgear Extender Setup solution.
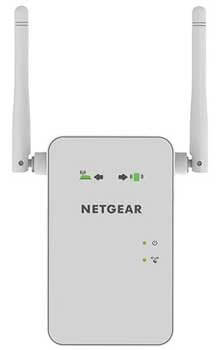
AC750 Netgear EX6100 is a mesh WiFi technology-based WiFi range extender that promises high-speed and high-performance internet solutions. It is a top-notch Extender model from Netgear that is built for serious gaming, live streaming, and internet surfing. The brand Netgear claims that AC750 EX6100 is capable of repeating the signals of a router up to 1000 sq. ft. of the area and approximately 15 client devices can connect to it. Additionally, the device’s speed is 750 Mbps which is more than enough for use in homes. Some prominent features of the device include a one-touch Netgear EX6100 setup, universal compatibility, smart roaming with one WiFi name, and dual-band frequency. Apart from this, it comes with a compact design that makes it an easily portable device
AC750 Netgear EX6100 Setup (WPS Method)
WiFi-Protected Setup (WPS) is a one-touch setup solution. This configuration option allows users to execute the Netgear EX6100 setup within 5 minutes. It is quite simple to execute a Netgear WPS setup. However, if you are using this quick setup option for the very first time, you might encounter some difficulties. To avoid any sort of difficulties and interruptions during the WPS setup, you should focus on the following steps.
Things to Consider Before Getting Into the WPS Setup Process
Before rolling on, make sure both the Extender and Router are at a closer distance. If they are placed more than 20 ft. of the distance from each other, you may find it difficult to establish a successful connection. Secondly, you need to make sure that you are not using an inactive or short-circuited power outlet. Apart from this, check if the device that you want to extend has a WPS functionality.
Steps to Follow to Execute Netgear EX6100 Setup
- Plug in the Extender and then power it on.
- Plug in the Router and switch it on as well.
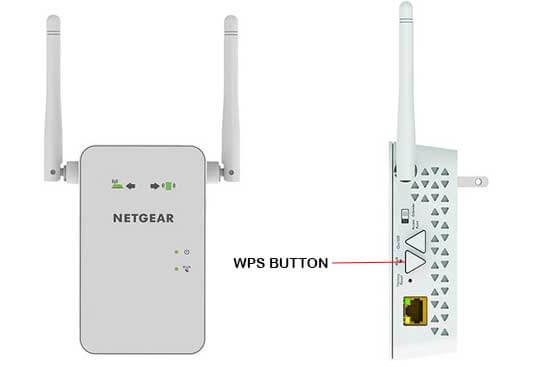
- Locate the WPS button on the AC750 Netgear EX6100 Extender and then gently push it.
- Locate the WPS button on the router and then push it within 2 minutes. (if you press the WPS button a little late, you need to restart the WPS setup process)
- Wait for a few seconds. If you notice a blinking WPS LED on the extender, the setup process is in progress. A stable green WPS LED is the indication that the setup is completed.
- When you notice a solid green WPS LED, move your devices to a strong network location and power cycle them.
That’s all. Now, enjoy high-speed and seamless internet connection all across your home. You will now not have to search for the network range at different corners of your home anymore. However, if the setup process is not executed correctly, you may not be able to connect a client device to the new WiFi Extender Network.
In this case, try executing the Netgear EX6100 setup again using either the WPS method or another setup option. But, if you do not want to be indulged in this bothersome process, our technical support professionals are there to give you a helping hand. Connect to them at +1 408 477 8750 or simply request a call back by writing to us via [email protected]. We usually respond quickly.
Perform Netgear EX6100 Setup Manually
Setting up AC750 Netgear EX6100 manually is a little complex in comparison to configuring it using WPS. However, if you know the right process and are aware of the technicalities, it would be a cakewalk for you.
For your convenience, we have outlined the complete manual setup process of the device in two stages; login steps and setup steps. It is easier to understand and thus it will help you in carrying out the Netgear setup smoothly. Have a look at the step-by-step setup process below.
AC750 Netgear EX6100 Login Steps
- First, ensure you have all the pre-requirements for the manual setup covered including Netgear login credentials.
- Plug in the AC750 Netgear EX6100 Extender model.
- Power on the device using the power button or switch. (If the Power LED on the extender is blinking for too long, power cycle the device. When the Power LED turns solid green, you can proceed ahead).
- Connect your Netgear EX6100 WiFi Extender network to a client device (PC or phone). For that, go to the device’s Wi-Fi settings> search for the available networks> select NETGEAR_EXT. from the network list> use the default password to connect to the network.
- Go to your favorite web browser and visit the Netgear login portal using either the default IP address (192.168.1.250) or web URL (mywifiext.net).
- A screen with the “New Extender Setup” option will display next.
- Click on the “New Extender Setup” button.
- Complete the account creation fields on the next screen (if you do not have an account with Netgear). You may also continue with the default login credentials of Netgear which you may find either on the product label or the quick installation guide.
AC750 Netgear EX6100 Setup Steps
- Ensure the Access Point/Extender Toggle Switch is set on Extender mode and then click the “Continue” button to move ahead in the setup process.
- On the next interface, select your existing WiFi router network SSID that you wish to extend.
- Check the 2.4 GHz and 5 GHz boxes to extend both bands. If you just want to extend one of these bands, check only one box and then click “Continue” to proceed further.
- Now, enter the security key or network key (password) of the router in the required blank.
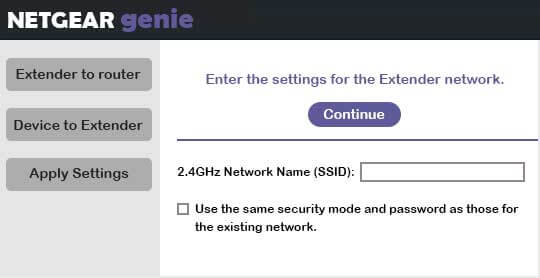
- In the next step, you need to set up a new network name (SSID) and create a new security key for the same for future use.
- The next screen will display a list of all the available networks around your client’s device.
- Connect your client device to the newly created Extended WiFi network using the network credentials that you created just before the last step and then continue.
- A confirmation message for the established connection will display shortly.
Your AC750 Netgear EX6100 setup is completed now. There is a registration process to be completed after this but you can skip that and complete it later. In case you come across any complex issues during the setup process, feel free to connect with our team at +1 408 477 8750. You can also choose other communication methods such as email. Send your queries or request a call back at a better time via [email protected]. We assure you to cater to you with the most fruitful assistance.
Netgear EX6100 Setup Using the App
Users can also utilize the Netgear Nighthawk or Genie App to execute the AC750 EX6100 setup. For new range extenders launched by the company, Netgear recommends users use its app to carry out the setup process. It is a fast and safe way to do that.
Here is the quick guide to completing the Netgear setup process using the app.
- Download and install the Netgear Nighthawk or Genie app on your device. If already installed, ignore this step.
- Connect the client device to your Netgear Extender SSID. NETGEAR_EXT. is the network name that you need to search for while checking all the available networks on your device.
- Launch the Netgear App next.
- Follow the instructions step-by-step to complete the setup.
- Once done, adjust the placement of your devices, restart them, and then connect to the Extender WiFi network again.
Start enjoying an extended WiFi network all across your home now. Whether you want to watch live shows or experience uninterrupted online gaming, you can do that at the best level.
Fix Technical Issues With These Troubleshooting Tricks
While performing the AC750 Netgear EX6100 setup, users usually encounter several different issues. These issues are frustrating and can spoil the real video streaming, gaming, and conferencing experience. You can use them with different troubleshooting tricks.
Here, we are sharing a few common Netgear setup problems and their effective solutions.
Common Netgear EX6100 Setup Problems
- No internet
- Mywifiext.net now working
- Incorrect login credentials
- The extender is connected but the internet is not working
- Frequently showing “lost internet connection”
- Netgear App is not working
- Mywifiext.net is taking too long to load the page
- Blinking LED Light
- Incorrect IP address or web address
- Unable to complete the process using a particular device or setup option
- Lost configuration CD
There are such many issues you may experience while getting into the AC750 Netgear EX6100 setup process. You can fix them all with some effective troubleshooting tips.
Basic Troubleshooting Tricks to Fix Technical Issues
- Power cycle the Netgear Extender
- Restart the router that you wish to extend
- Change the client device that you are using to connect to the Extender network
- Unplug the devices and try connecting to the extender after some time
- Move the Extender to a better network room
- Run a firmware update to the latest version
- Switch to another frequency band
- Use both frequency bands simultaneously
- Reposition the Extender’s external antennas
- Replace the current omnidirectional antennas with high-gain antennas
- Get a brand new router for your home
- Keep away the metal objects and devices that use radio waves from the Extender
- Check the ethernet cable for cuts or bruises
- Make sure you are putting in the correct login credentials in the required blanks
Take Advantage of Our Remote Technical Support
These troubleshooting tricks should do the job for you. If this doesn’t happen, the most appropriate solution to execute the Netgear EX6100 setup for you is to take advantage of our technical assistance. Approach us right away. Give us either a call at t +1 408 477 8750 or you can simply choose to communicate with us via [email protected].
Common Mywifiext Setup issues
- Mywifiext.net Not Working
- Mywifiext.local Not Working
- Unable to Access Netgear Extender Login Page
- Incorrect Username and Password
- WiFi is Connected but No Internet
- www.mywifiext.net Login Issues
- Can’t Find the Extender Default SSID
- Server Error
- Unstable or Blinking LED
- Mywifiext.net Setup Issues
- Can’t access www.mywifiext.net
- www.mywifiext.net Taking too Long to Load