
Netgear Extender Setup
Let’s Talk
Call us to discuss your Netgear Extender issues with our experts and get the solution.
Got a Netgear WiFi Range Extender but are unsure how to get going with this? Alright, here is the complete installation, login, and Netgear Extender Setup guide for you. By carefully going through the details and reading the instructions given below, you can readily get started with your range extender.
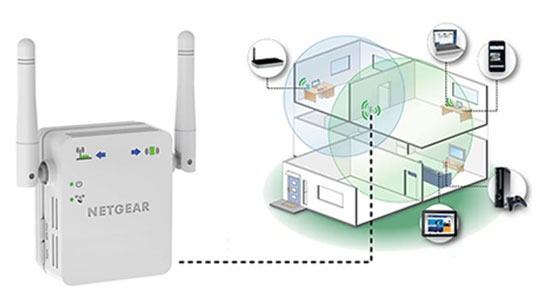
Netgear WiFi Range Extender At A Glance
A Netgear WiFi range extender or signal extender is a valuable purchase for any user that uses a wireless WiFi network. Not only does it extend the coverage of a network but also contributes significantly to the improvement of its overall performance. It comprises a variety of qualities and features that are practically useful. And, when it comes to technology, Netgear doesn’t compromise at all on recent advancements. Apart from this, the design of the Netgear WiFi extender is compact and attractive. It is also readily portable because of its size. This is the greatest advantage, especially for those who want to install their extender outdoors.
Coming to the login and configuration part, it is easy but at the same time, it is a little challenging as well. But, with our Netgear Customer Service, you can execute the entire Netgear extender setup process readily. These are a few things that make it stand apart from other similar products available in the market.
Basic Requirement For Netgear Extender Setup
Irrespective of the Netgear Extender Setup method that you opt for, the requirements for the configuration process are almost the same. Find out what you must keep handy before heading into the Netgear WiFi Extender Setup process:
- A Netgear Wireless WiFi Range Extender/ Signal Extender
- A High-Performance Router or Modem Which is Compatible with Range Extender
- Correct URLs for Netgear Extender Login and Setup Portals Like Mywifiext.net
- Existing or Default Netgear Extender Login Credentials (user ID and Security Key)
- An Internet-Enabled System that Supports Mywifiext Website and Netgear Nighthawk App
- Strong, Stable, and Reliable Internet Connection That Provides at least a Decent Speed
- A Room or Place with Strong Network Signals and Better Connectivity
- Ethernet Wires That Function Optimally and are not Cut or Bruised
- Fluctuation and Fault-Free Power Source (an Electricity Outlet)
Key Things to Consider Before Getting into the Setup Process
The Netgear Extender Setup process is complex and challenging. To complete this smoothly and successfully without any hassle, it’s crucial to learn a few things. Those are as follows:
- Setting up a Netgear Range Extender means getting it ready to get started and function properly
- Compatibility between your existing modem and Netgear extender is a crucial factor
- The placement of both devices including the extender and modem should be perfect
- Certain electronics and devices that use radio waves interfere with the WiFi network
- A slow-performing or malware-affected internet-enabled system delays the Netgear Extender Setup
Netgear Extender Setup Methods
Users of Netgear WiFi extenders can utilize a few different methods to execute the setup. All these setup methods are genuine and you can find the details regarding the same in your Netgear extender product manual. Netgear Extender Setup methods include the WPS, Mywifiext.net Setup, and Nighthawk Setup. Find detailed information about these setup procedures in the following sections.
WPS (WiFi-Protected Setup)
The WPS setup procedure is super simple. It doesn’t take even 5 minutes to complete the setup process using this method. Here’s what you need to do to execute and complete the Netgear Extender setup using the WPS method:
- Find a location where network connectivity and range are good enough
- Turn on your router if it is powered off
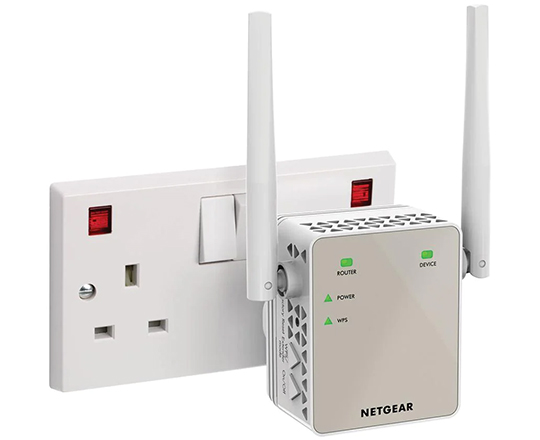
- Plug the range extender into a power socket that is not faulty
- Power on your range extender by pressing the power button
- Next, locate the WPS button on your Netgear extender and press it
- Wait for a few seconds and then locate the WPS button on your existing modem or router.
- Probably, you will find this button on the rear or bottom panel of the device, depending on the product model
- Press the button and wait for the status light to give an indication
- When the flashing status LED will turn solid, the Netgear Extender setup will be completed
Mywifiext.net Setup or 192.168.1.250 Setup
Mywifiext.net setup or 192.168.1.250 setup is completely different from the WPS Netgear Extender Setup. It is more complex and challenging and it consumes more time as well. To execute this complicated Netgear setup process, you must have at least the basic knowledge and understanding of Netgear WiFi products, their functions, and procedures. For your convenience, here we have listed down the steps that you need to follow to execute and complete the Netgear Extender Setup for your device’s model:
Initial Steps For Netgear WiFi Extender Setup Procedure (Using Mywifiext.net)
- Be ready with all the Netgear Extender Login and Setup essentials, including an internet-enabled system, fast internet, and a host router that you want to extend.
- Start the process by plugging your range extender into a power socket.
- Wait for the power LED to light up. If the Power LED takes time, simply power off and then on again the extender using the power button.
- Turn on your PC or computer and then connect it to your Netgear WiFi network of the extender.
- To do that, under the WiFi setting of your device, search for the “NETGEAR_EXT” SSID which is the default WiFi network name for Netgear range extenders. You may not need to enter a password but if it asks for a password, you can use the default Netgear WiFi network password.
Netgear Extender Login Using the Mywifiext.net
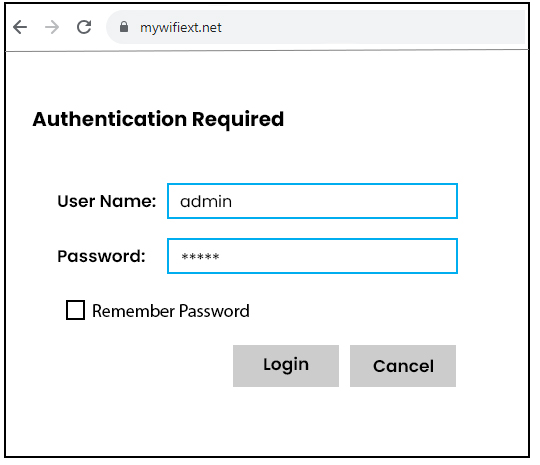
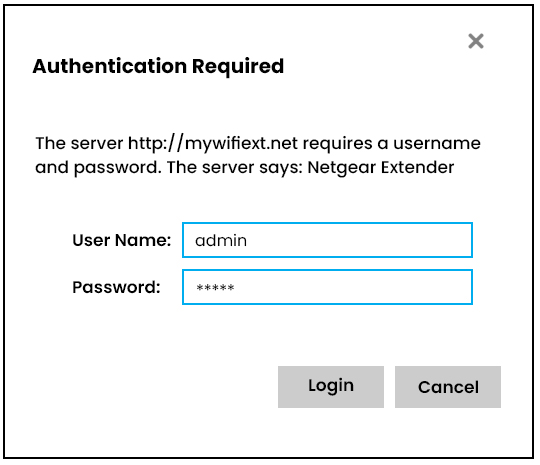
- Head to a browser and launch it on your device and then type mywifiext.net or 192.168.1.250 into the URL or address bar of Google. This action will redirect you to the New Extender Setup page.
- Now, tap or click the “New Extender Setup” option on your device’s screen. You might get a prompt for accepting the terms & conditions. Click Yes or Agree to move ahead.
- Next, select the admin credentials for your Netgear WiFi range extender. You will require these credentials to access the WiFi settings of your extender on a web interface and log in to the extender device.
- From the drop-down menus, answer two mandatory security questions to verify your account. Answering these questions, you can log in to your account if you forget the admin credentials. You can also recover the login credentials.
- You will have a Netgear Genie option to choose from. If you want to go with this select “Yes” or “Continue”.
Steps Netgear WiFi Extender Setup
- Your extender will start looking for nearby WiFi networks. Select a particular radio wave frequency out of 2.4 GHz and 5 GHz.
- If you are not seeing any network with your extender’s SSID, click on the “See More” option. Your extender network will appear soon in the network list. Select your extender’s network and then click “Next”
- Now, enter the existing or default password for your current network and then click “Next” to move ahead in the Netgear Extender Setup process.
- Create a new SSID and password for your extender’s network. By default, the extender uses the name of your existing network, with _2GEXT for the 2.4GHz band and _5GEXT for the 5GHz band. And the default password for each band is the same as the password for your current network.
- There is an option for you to use the same WiFi name and password for your Netgear WiFi Extender as you do for your existing network. However, this is only possible if your extender supports it. If you want to go with this option, click the Enable One WiFi Name box to make use of this feature.
- Now, your device will apply the Netgear WiFi Extender setup settings and this may take some time. You may see the WiFi network name (SSID) and password for each of the frequency bands.
- Next, head to the WiFi settings of the device that will be connected to the extender network and then connect to the extender’s new network.
- Return to the Mywifiext.net web interface, check the box at the bottom of the page, and then tap “Continue.”
- Congrats! You have successfully executed Netgear Extender Setup. Now, you can enjoy seamless internet connectivity.
Netgear New Extender Setup Using the Nighthawk App
Except for the above Netgear New Extender Setup method or procedure, you can execute the configuration process using the Nighthawk app. This app is a versatile mobile application that supports both Android and iOS. Netgear extender users who want to set up their devices using this method must have either an Android or iOS device.
Steps to Perform Netgear Nighthawk Setup
To set up your Netgear extender device using the Nighthawk mobile application, here is the process you need to follow:
- First, if you don’t have the Netgear Nighthawk App installed on your mobile device, download and install it from the respective application store.
- After completing the download, ensure that your existing router has a stable internet supply from your ISP.
- Next, in your diary or digital notes, make a note of your existing router or modem’s SSID and password.
- Now, start the Netgear Extender Setup process by pressing the power button on the extender device. Before attempting the next step, wait for the power LED to turn solid.
- Once the device is on, turn your mobile screen on and head to the WiFi settings.
- Search for the default Netgear Extender’s network name (SSID) which is NETGEAR_EXT and then select it.
- If you do not find this SSID in the network list, click on the “See More” option.
- After connecting your mobile device to the extender’s network, launch the Netgear Nighthawk app on your device.
- Log in to the Netgear Extender by using either your existing Netgear Extender login credentials or default user ID and password.
- Now, keep moving ahead and perform the steps step by step as per the instructions given on your mobile phone’s screen.
- Within a couple of minutes, your range extender will be configured and then you can enjoy high-speed internet.
Using an Ethernet Cable For the Setup
In case the wireless web-based Netgear new extender setup fails, you can use an ethernet cable. All you need to do is to establish a firm connection between your router and extender using an ethernet wire. Check your Netgear extender kit and take out the ethernet wire. Insert one end of the wire into the ethernet port of the extender and another end into the ethernet port of the existing router or modem. Initially, the ethernet LED will blink but turn solid later. A solid ethernet LED means a firm connection.
Once the connection is successfully established between the devices, turn on your internet-enabled device. Visit the Mywifiext.net portal and then perform all the steps that we have listed above in the Mywifiext.net setup section. With this method, you can execute the setup process without any hassle.
Common Netgear Extender Setup Issues That You May Face
Encountering technical issues with networking devices is very common. Netgear extender is no different. While attempting the Netgear Extender Setup process, you can come across a wide variety of issues. Those issues can be frustrating and can delay the setup process. Here, we have listed below a few Netgear WiFi Extender Setup errors that you should be aware of:
- Mywifiext.net not working/refuses to open/fails to load
- The Netgear extender unable to connect to the router or modem
- The frequent dropping of internet connection
- Incorrect Netgear Extender login user ID or password
- The Netgear extender is incompatible with the existing router
- WiFi is connected but no internet
- Unsupported frequency bands
- The Netgear Nighthawk App is not responding
- The Nighthawk App unable to detect the extender’s network
- Unable to make a wireless connection between the extender and router

Troubleshooting and Fixing the Netgear Extender Setup Errors
It is important to address the Netgear Extender Setup errors that we mentioned above as quickly as possible. This is because it delays the new extender setup and irritates users a lot. There are many genuine and tested ways to troubleshoot and fix these errors. We have explained them below!
Keep the Device Closer
The distance between your WiFi router and extender should not be more than 10 meters. And if possible, try to place both wireless WiFi devices in the same room. It is ideal for receiving high speed, larger coverage, and seamless connectivity. This troubleshooting can help you fix the connectivity and coverage issues.
Check Power Supply
Make sure both your router and extender are firmly connected to a power outlet. A solid green light on the extender signs that everything is fine. In case the power LED does not light, it is an indication that there is an issue with the power supply. Check that out and try to fix that by plugging the power adapter out and then in again.
Try Clearing Caches & Cookies
If you are unable to access the Netgear Extender Setup portal on the web, clearing cache files and cookies can help. If clearing caches and cookies of your browser doesn’t help, reset the browser or update your system’s software, if required. These troubleshooting hacks can fix Netgear Extender Setup portal access issues.
Try Using Alternatives
If you are unable to do the Netgear WiFi Extender Setup despite trying different methods, try different alternatives. For example, if your existing modem or router is not compatible with your Netgear Extender, try using another modem. And if the system you are using for the setup is not responding well, you can try another device.
Reach Out to Us Now For Netgear Extender Setup Assistance
Now, find our contact details at the top of this page to reach out to our professionals. They are available to handle your queries and issues during business hours. But they can also attend to your call and queries during non-business hours. So, feel free to contact us anytime. We will do our best to provide you with the right Netgear Extender Setup technical solutions.