
Netgear AC2200 WiFi Mesh Extender Setup
If you are constantly facing the issue of internet connectivity then you should definitely invest in a wifi range extender. A good quality wifi range extender not only provides you good speed but also covers your entire area. With its successful installation you will no longer face various connectivity issues. So today let’s explore the Netgear AC2200 wifi mesh extender setup.
Understanding Extenders
Before we delve into the setup process for Netgear AC2200 series first let’s understand what it is and how it works. So as the name itself suggests it is a wifi range extender that helps you expand your existing network. It effectively increases the range as well as provides fast speeds. Further, it eliminates all the dead zones from your house. Basically, it works with your existing router. Firstly, it takes up the signals from the router. Secondly, it multiplies these signals in huge numbers. Lastly, it rebroadcast the signals in the different corners. Thus, you do not face connectivity issues in any area of your home. In short, the AC2200 wifi range extender provides you internet signals from the front door to the backyard of your home.
Step-by-Step Guide to Effortlessly Setting Up Your Netgear AC2200 WiFi Mesh Extender
Netgear AC2200 wifi mesh extender setup is extremely easy and straightforward. You do not need any tech degree to set it up. With a few simple steps your extender will be ready for use.
Placement
Firstly, place the extender in the same room as your router. There should be close proximity between both your extender and the router. Make sure there are no thick walls or any other physical barrier between both the devices. Secondly, during the setup process also remove all the electronic and metal objects that are placed near the extender. Electrical devices like cordless phones, microwaves, radios etc can interfere with the signals. This is why it is advised to remove all these appliances before proceeding with the setup process.
Power On
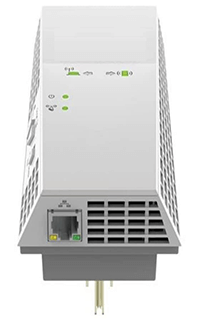
Next, plug in the range extender into the wall socket. Switch it on. Wait for the power LED on the AC2200 extender to turn solid green. If you do not see any light then press the power button on the extender. You can easily locate the power button on the side panel of the extender. As it turns solid green, move to the next step.
Press The WPS Button
Further, press the WPS button on the AC2200 extender. Within the next 2 minutes press the WPS button on your host router. Now, you will see a blinking green light on the WPS LED of the extender. This means the connection is being established. Once the WPS LED as well as the router link LED turns solid green it means the setup is all done.
Unplug And Move The Extender
Now, once the setup is all done it’s time to move the range extender to a new location. This new location is the center of your home, it is because it will cover the wider area. Place the extender halfway from the router and the area where you need better connectivity. Plug it in and power it on. Now, check the router link LED on the extender. The LED light should be solid green as it means the connection is ultimately best. But in case it is showcasing a solid amber light then move the extender slightly towards the router until the LED turns solid green.
Test The Connection
Finally, it’s time to test the connection. For this take any device of your choice. It can be any device like laptop, ipad or your smartphone. Connect it to the newly extended network. The new network name will have _EXT added at the end. Once connected, move around different corners of your home especially those that previously had poor connectivity or no connectivity at all. Start streaming anything on the device. Now keep the device there and come back to the extender. Check the client device LED to know the status of connection between the device and the extender. The solid green light means the best connection whereas the amber light means a good connection. But if there is a solid red light then it means the connection is poor and you need to move the extender closer to the area.
As we said earlier, placement is the key. So you need to try different locations until the router link LED as well as the Client device LED flashes a solid green light.
Connect To Us For Help!
Feel free to contact us for any query, help or issue. Our highly experienced and expert team members will resolve all your issues instantly. Further, we are available 24/7 so you can contact us anytime. For direct one to one conversation you can call us. You can also write your queries through mail. Lastly, we also offer a live chat option for instant help. You can find all the contact details downwards.